Passing the movement test could prevent the printing toolhead from falling off.
Activate the movement test by clicking Menu > Machines > choose your machine > Commands > Run Movement Tests.
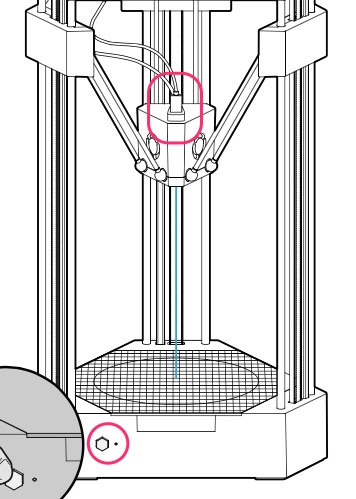
Please follow the film to install Printing Toolhead correctly.
If the machine couldn't pass the movement test (sometimes the printing toolhead fell off during the test), please check the following:
- Check if the 12 ball joints are lubricated, please refer to this article.
- The toolhead cable very firm when brand new, please manually rub the cable to make it softer (especially the section near the plug).
- Check if the cable port of the printing toolhead is facing the front.
Re-run the movement test if you've checked the steps above. If the machine still fails to pass the test, please reinstall the filament tube and the cable following the tutorial below.
Note: the cable is rigid when entirely new, causing the toolhead more likely to detach during the test, the occurrence should be reduced after a period of time.
- Move the printing toolhead to the bottom right corner.
- Straighten the filament tube from top to the bottom, and install the tube to the printing toolhead through the cable holder.
- Insert the toolhead cable to the port at the upper case, make sure you insert the cable to the very end.
- Straighten the cable and make sure it is not twisted, then insert it to the toolhead through the cable holder.
- Puch the cable holder to the bottom till it closely touches the toolhead.
- Re-run the movement test.
*If the movement test still failes, please unplug the cable and turn it clockwise or counterclockwise 180° before plugging it again to the toolhead. Contact our support staff if the machine still fails to pass the movement test.
Comments
0 comments
Please sign in to leave a comment.