The diode laser module (5W, wavelength 450nm) can be used simultaneously with the original configuration of the CO2 laser. Because specific types of stainless steels have a higher absorption rate for blue light with this certain wavelength, they can be engraved.
*Do not use the touch panel to control the laser head in Maintain mode when the Diode Laser module is mounted. If you want to move the head under Maintain mode, please unlock the motor before moving the laser head to avoid any damage.
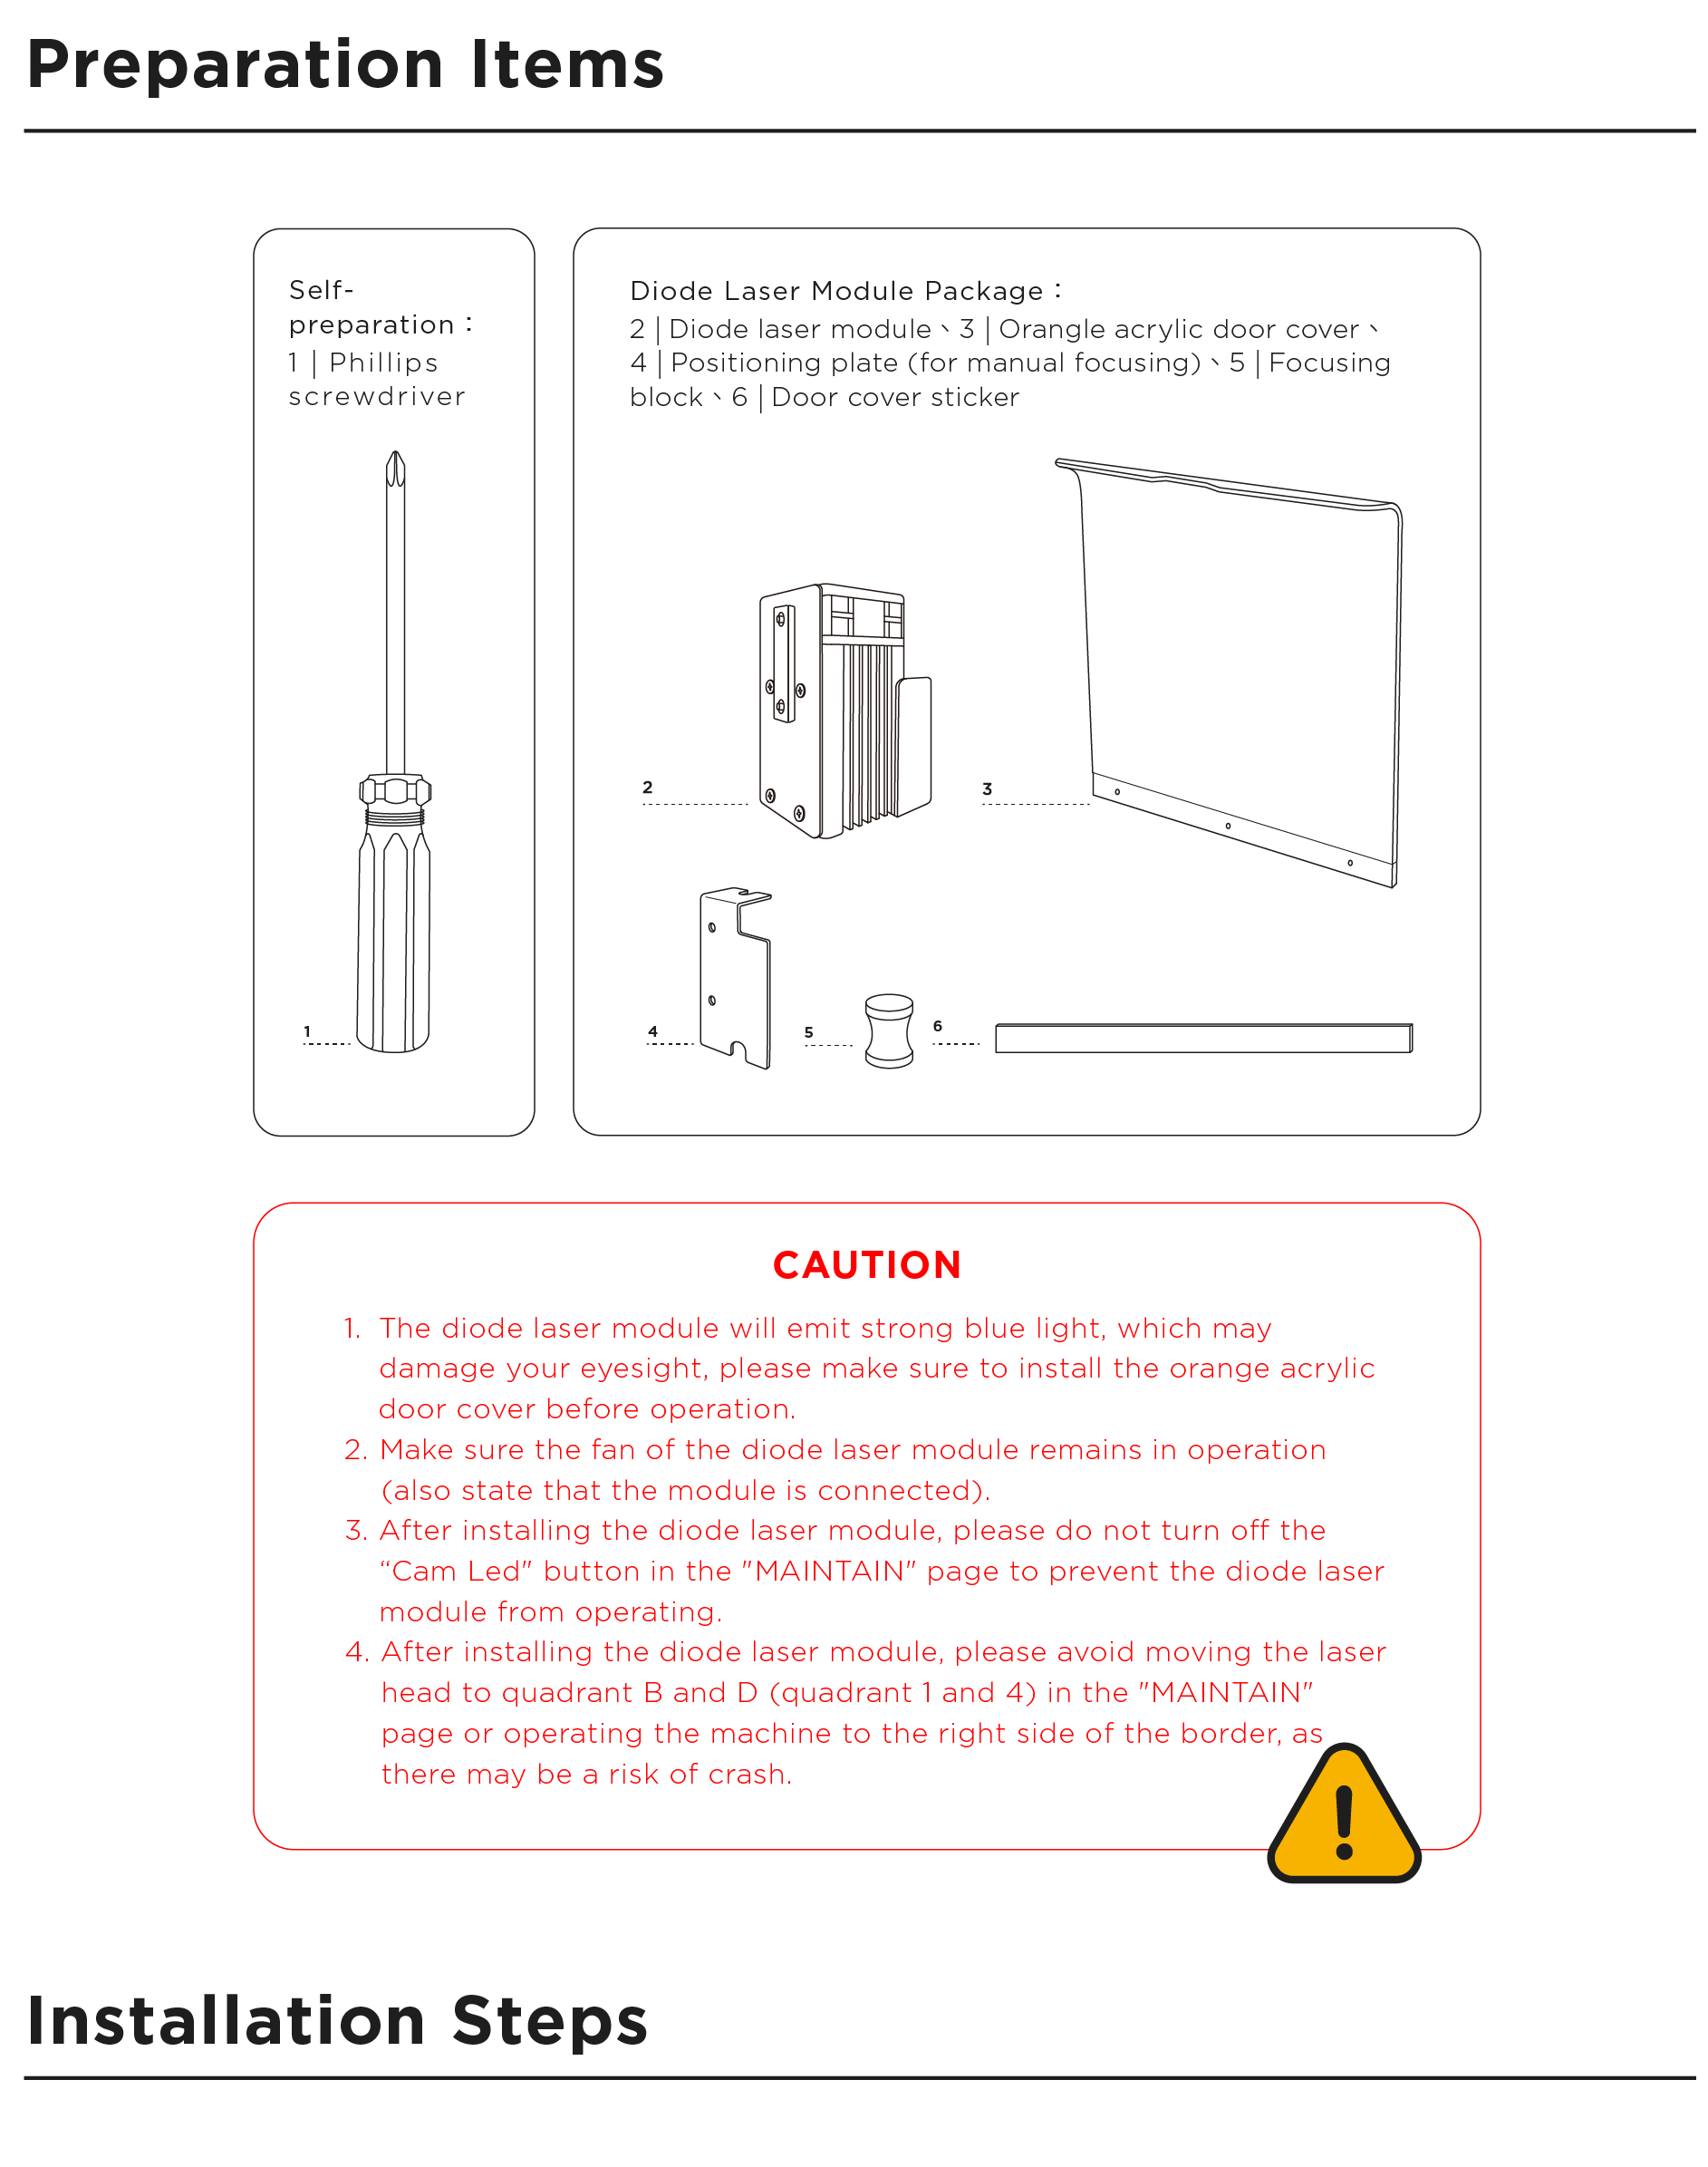
Turn off the machine > Move up the CO2 laser module bracket > Attach the positioning plate to the CO2 laser module bracket > Install the diode laser module > Connect the diode laser module cable > Substitute the orange acrylic door cover for a transparent acrylic door cover > Turn on the machine.
*If the beamo is equipped with an autofocus add-on, you can start the installation from step 4 after turning off the machine or clicking this video.
-
Turn off the machine.
-
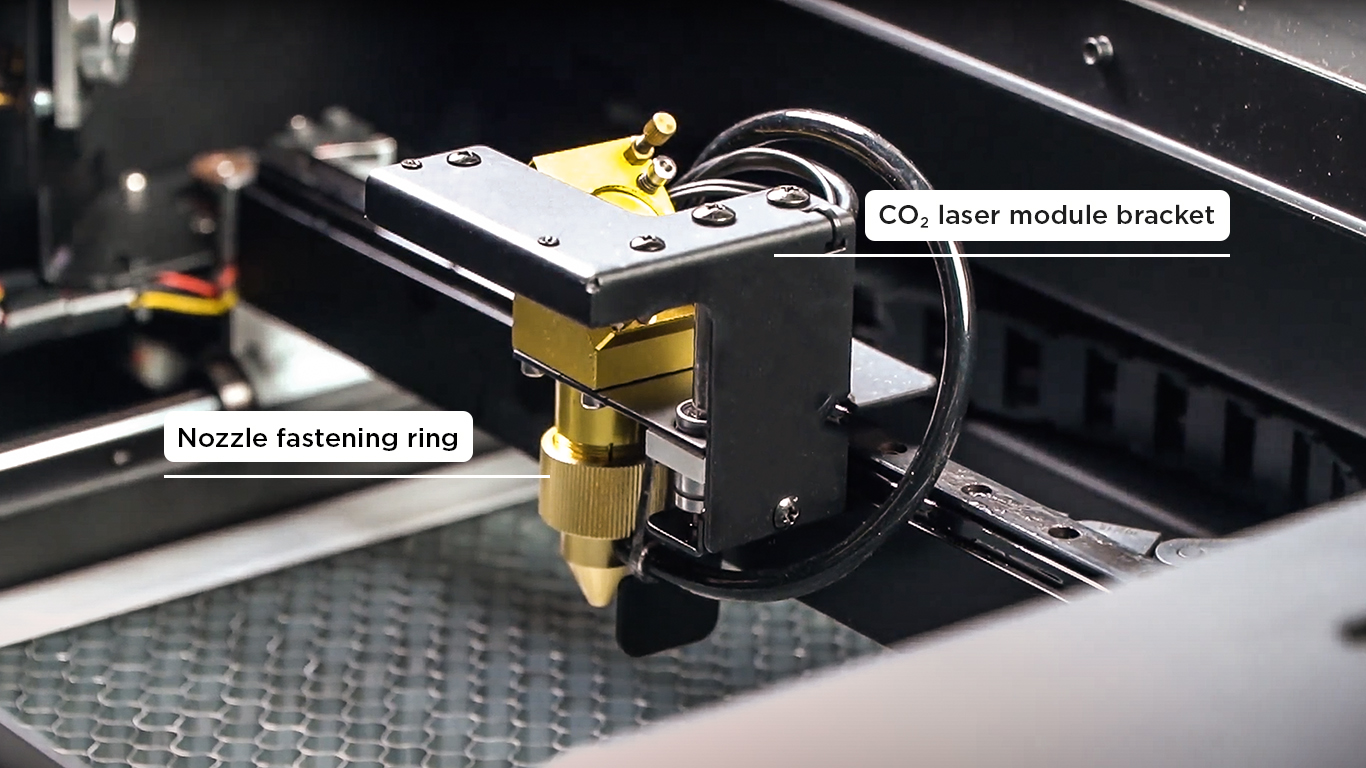
Moving up the CO2 laser module bracket :
Unscrew the nozzle fastening ring > moving up the CO2 laser module bracket > tighten the nozzle fastening ring.
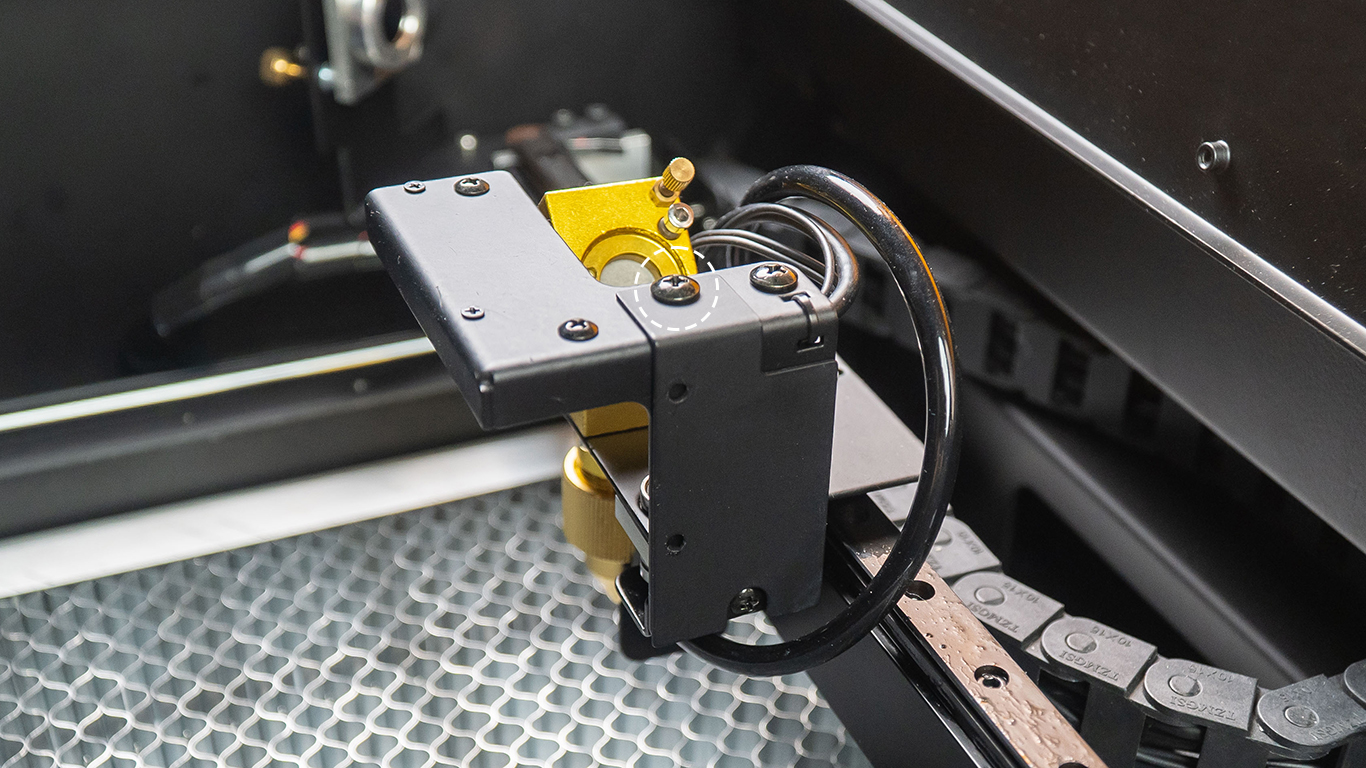
3. Attach the positioning plate to the CO2 laser module bracket :
Use a Phillips screwdriver to loosen the screw marked in the figure below > Tear off adhesive film on the positioning plate > Stick the positioning plate as shown in the figure > Lock the screw back > Leave it for 12 hours.
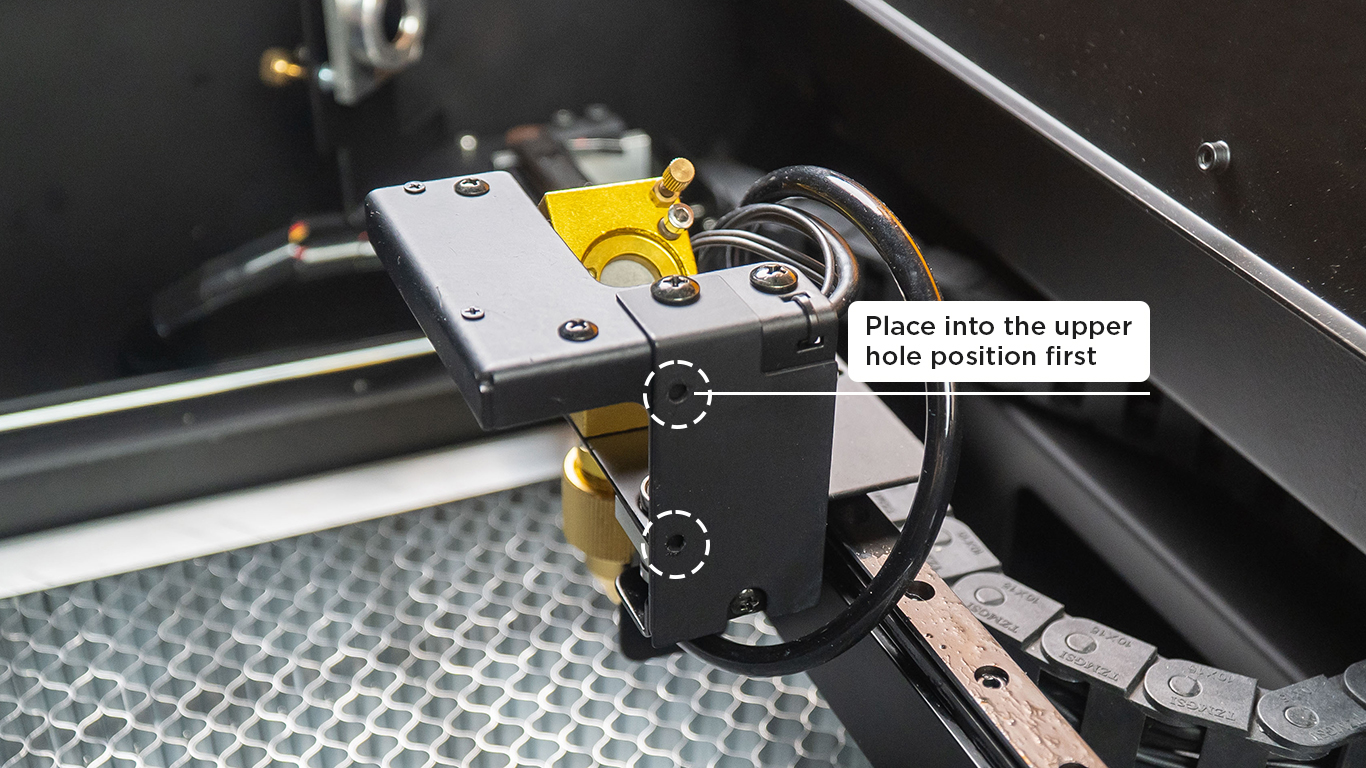
4. Install the diode laser module :
Insert the pins of the diode into the holes on the positioning plate (or bracket of the autofocus add-on), place into the upper hole position first for better operation.
Note: The location of the fan is above.
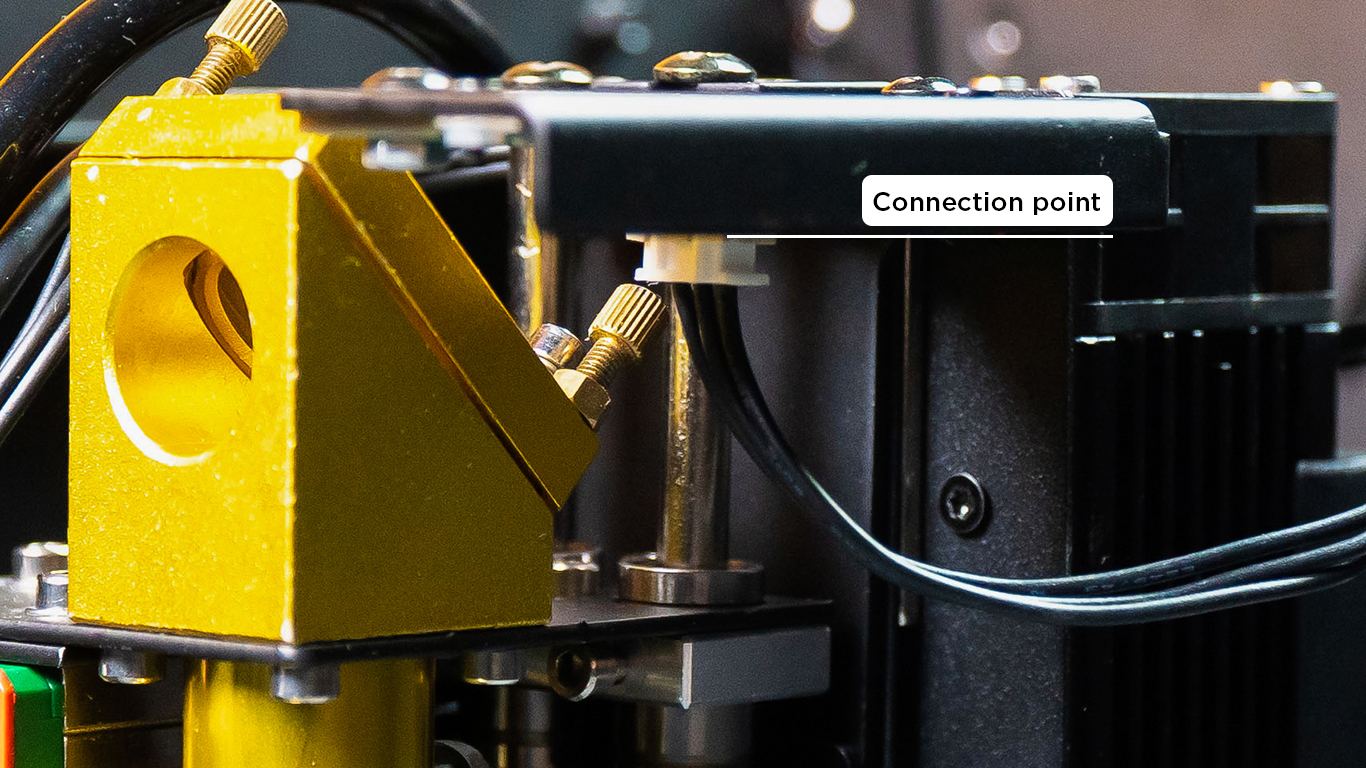
5. Connect the diode laser module cable.
Note: Hands away from the diode module laser light.
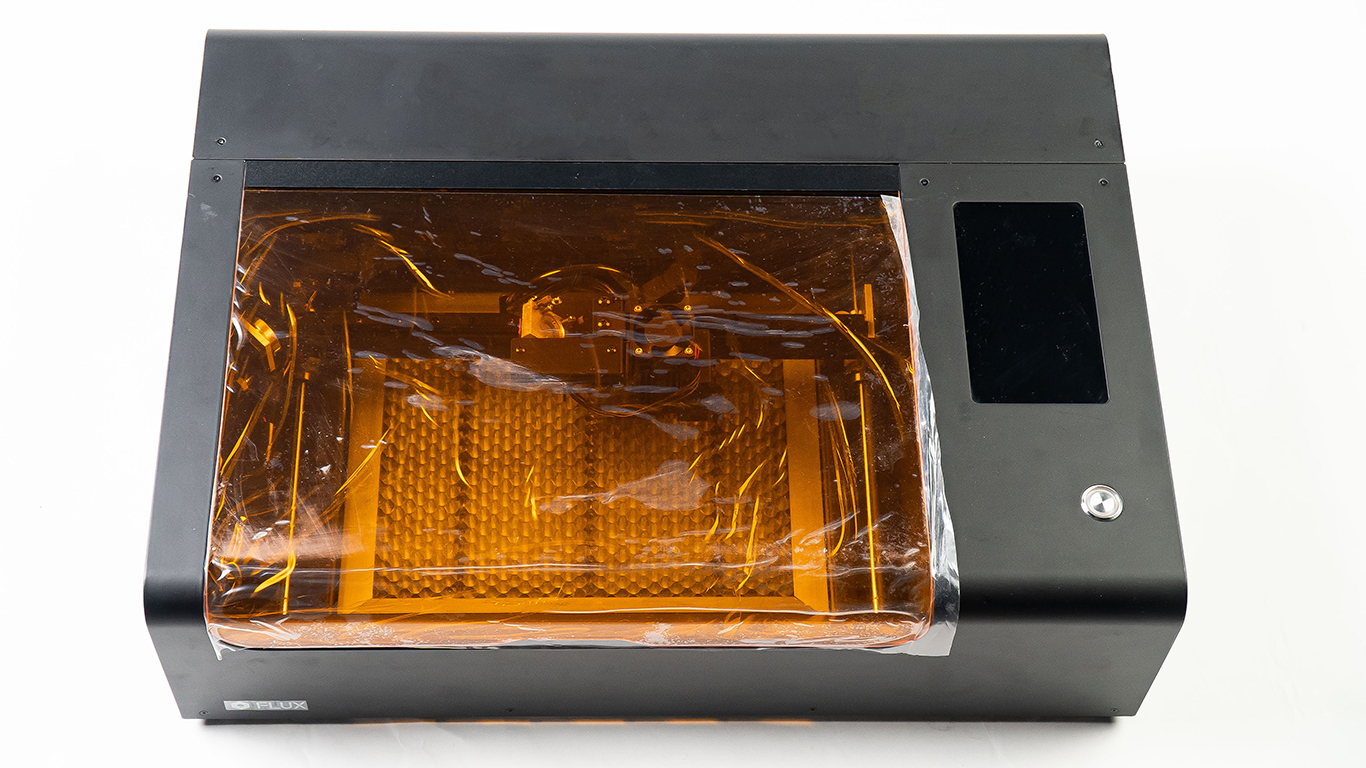
6. Substitute the orange acrylic door cover for the old transparent acrylic door cover :
-
Before the installation, please check your beamo's Serial Number to determine which instruction to follow. The Serial Number will be on the back of your beamo as the picture below:
-
For New-type acrylic door (S/N after, bigger than, or equal to FBM12200004):
Please follow the instructions in the video.
-
For Old-type acrylic door (S/N before or smaller than FBM12200004):
A. Tear up the black sticker. (The back cover does not have to be removed.)
B. Use a Phillips screwdriver to loosen the three screws on the transparent acrylic door cover.
(Please keep the screws for later use.)
C. Replace the transparent acrylic door cover with the orange acrylic door cover.
(It's optional to keep or remove the protective film on the orange lid.)
D. Screw back the screws that were removed from step B.
E. Apply the new black sticker to hide the screws and the installation will be finished.
7. Turn on the machine and it is ready to operate.
*Do not use the touch panel to control the laser head in Maintain mode when the Diode Laser module is mounted. If you want to move the head under Maintain mode, please unlock the motor before moving the laser head to avoid any damage.

Since the laser output position of the diode laser module is different from CO2 laser, calibration is required to obtain the offset value between the laser heads.
* Before calibrating the diode laser module, make sure the calibration of the camera is accurate (“Calibrate Camera” has been completed).
1. Diode Laser Module Calibration, Focusing Preparation :
Select the name of the machine in the menu under “Machine” > “Calibrate Diode Laser Module” > Focus on a white paper > Plot the calibration image.
If the diode laser module is not calibrated, the engraving position might deviate.
2. Align the outside of the red square with the center square of the grid lines :
Only the displacement can be adjusted until the red square coincides with the center square of the grid lines (aligning the outside of the red square with the cut-out square). If the size of the red square is incorrect, you need to do the “Calibrate Camera” again.
3. Preview the engraved grid-lines area.
4. Make sure the diode laser module is calibrated correctly :
The paper needs to be fixed to avoid position changes during engraving. Draw an object at a certain position, create the same object at the same position on another layer, and use CO2 and diode laser module to engrave the two layers respectively. If the engraving positions overlap correctly, then the diode laser module is calibrated correctly; if the results do not overlap, then “Calibrate Camera” and “Calibrate Diode Laser Module” should be performed again. Avoid closed vector graphics as objects, otherwise, the engraving will be cut off and unable to be compared.
5. Calibration of the diode laser module is completed.

Replace the engraving material > open the software “Diode Laser” > focus on the object > camera preview > edit the engraving object > adjust the parameters and deliver the task.
1. Replace the engraving material :
Replace the calibration white paper as the engraving material.
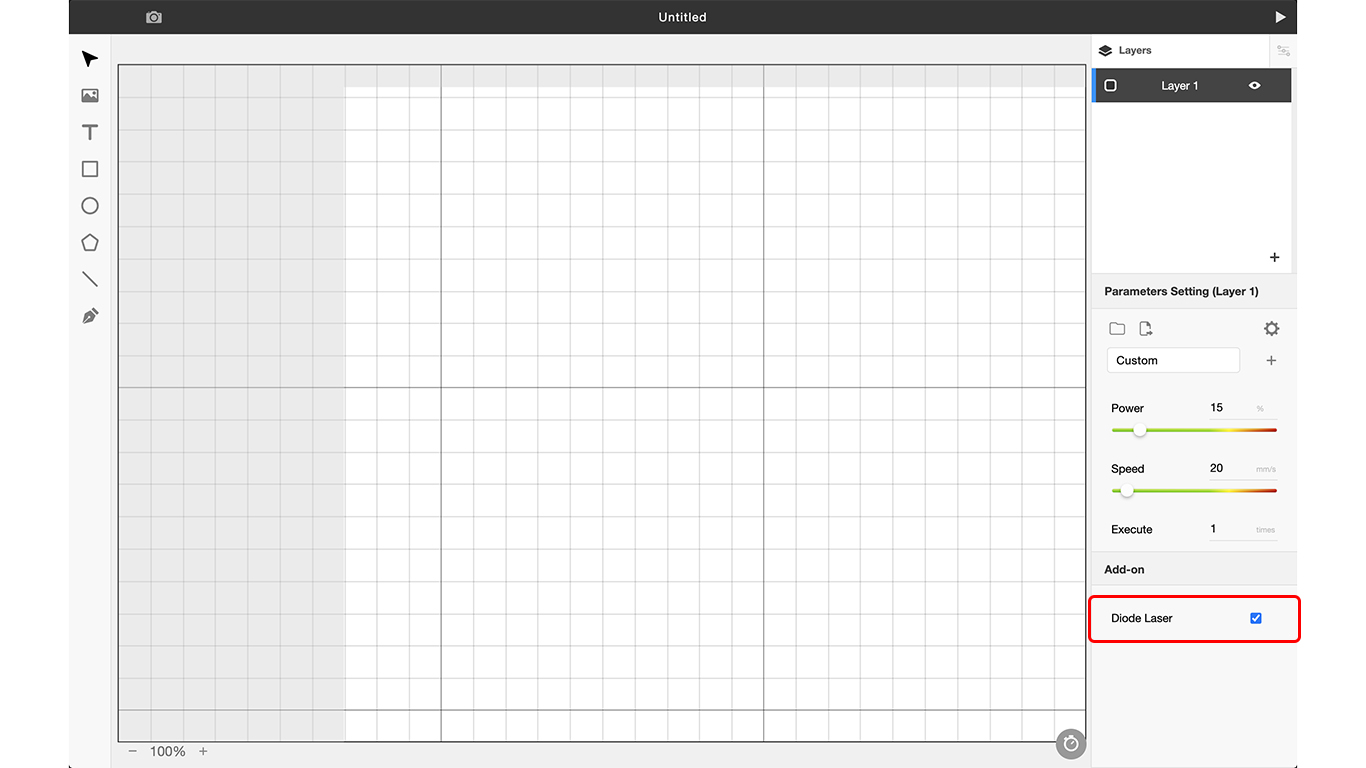
2. Open the software “Diode Laser” :
Menu > “Edit” > “Document Settings” > Enable “Diode Laser” > “Save”.
If “Diode Laser” is not turned on, the range limit of the software display cannot be turned on and there may be a risk of a diode crash. When the “Diode Laser” function is turned on, the “Diode Laser” option appears below the parameters.
After checking the box, you can use the diode laser module for engraving on that layer.
- For layers with “Diode Laser” checked, the working area will be restricted by a gray area.
- If “Diode Laser” is not checked, the layer will be engraved and cut with CO2 laser; avoid placing the engraved object too close to the right side, otherwise, there is a risk of the diode laser module crashing into the machine.
If the diode laser module is frequently used, you can set the diode laser to be turned on by default (Menu > “Beam Studio” >“Preferences” > Add-on - Diode Laser Default: On).

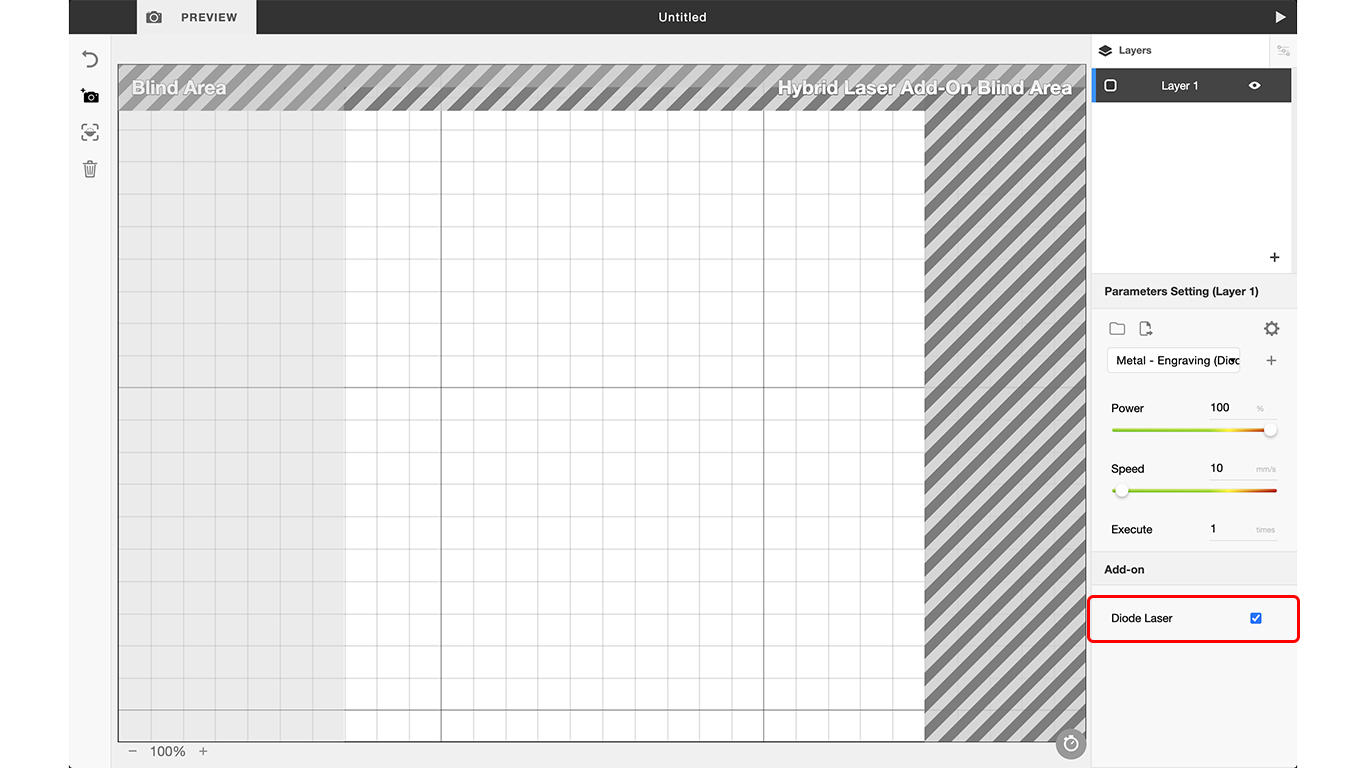
- Gray background: the area that cannot be engraved by the diode laser module (The diode laser module cannot reach to the left.) If “Diode Laser” is not checked, the gray background will be turned to the right side of the machine. CO2 laser cannot work over there because the laser head cannot reach out to the right.
- Hatch pattern: the area that cannot be previewed by the camera (the position obstructed by the diode laser module)
Work Area |After installation, the diode laser work area is 230mm x 200 mm, The CO2 Laser work area will be reduced to 250mm x 200 mm
3. Focus on the object :
- For manual focusing, you can use a focus probe or focus block, loosen nozzle fastening ring and make the focus probe touch the engraving material, then tighten the nozzle fastening ring and rotate back the focus probe after finishing the focusing. (Focal length: 12mm)
- For autofocus, double click the side button of the add-on to make the probe touch the engraving material.
4. Camera Preview :
Preview the range of engraving material.
5. Edit the engraving object.
6. Adjust the parameters and deliver the task :
The diode laser module needs to operate with a higher power, otherwise, it cannot engrave the material.
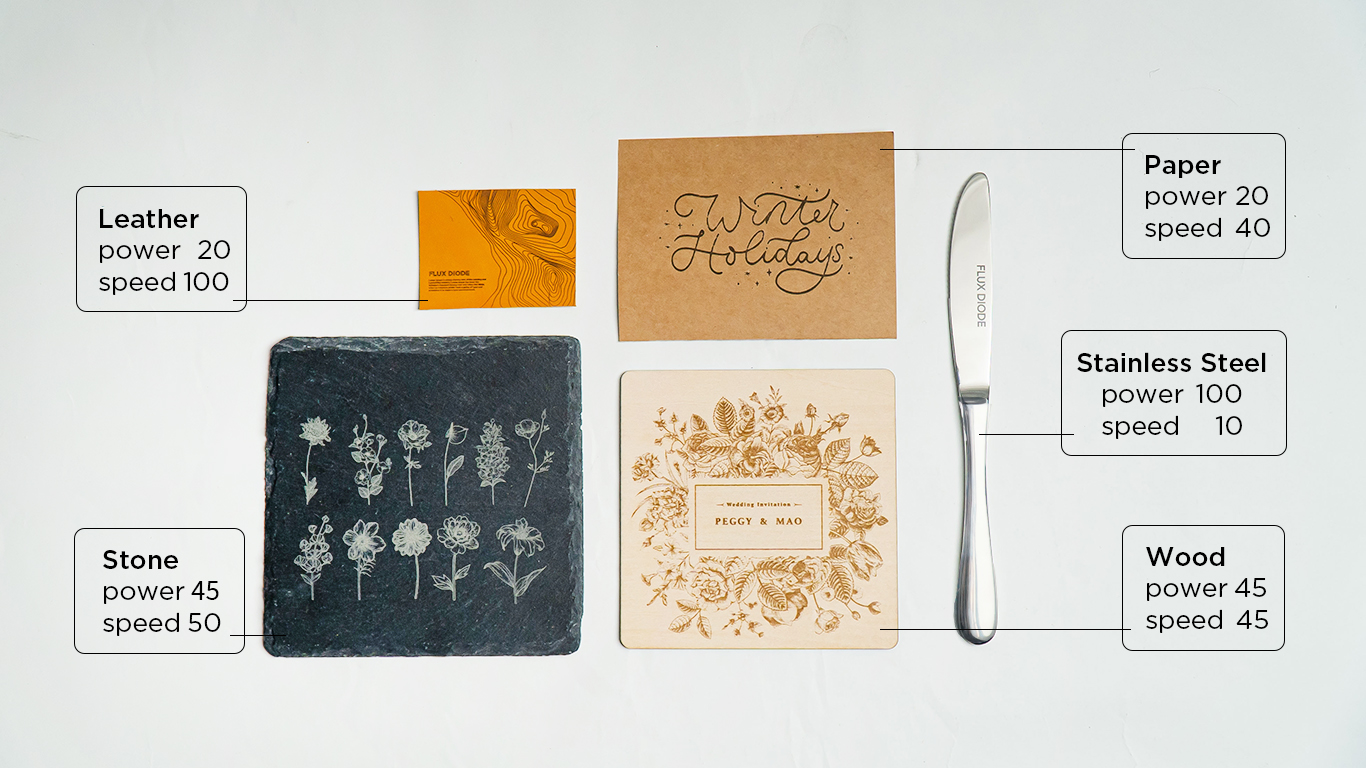
Generally, it is recommended to use 100% power and 4~10mm/s speed when engraving stainless steel.

The actual engraving effect is subject to your own test results.

The diode laser module does not produce light.
Possible causes :
-
Beam Studio has not enabled the diode laser module according to the above steps.
-
The “Power Rate” setting on the machine is far too low, please adjust it back to the default value of 1.0.
-
Diode laser module is not on :
If not, go to the “MAINTAIN” page and click the "Cam Led" button. If the fan starts to run, it means the diode is on. (The "Cam Led" button is the diode laser module switch.)
*If the above steps still cannot solve the problem, please contact the customer service team.
Comments
0 comments
Article is closed for comments.